

How to connect an image generating chat bot to a Discord server
By now you’ve probably seen some really incredible examples on twitter or reddit of machine-generated images given only a specific text prompt. It turns out that if you have a decently powerful video card, you can generate your own, without having to create an account on Midjourney or Bing Image Creator. Today we’re going to go through the steps of setting up such a model, and we’re also going to talk about how to set up a Discord chat bot so that you can let your friends try it out.
Before going any further, I first want to point out that if you create a Discord chat bot, you are undertaking several responsibilities. For instance, you have to be compliant with data privacy laws such as GDPR and California’s Consumer Privacy Act. Basically, that means don’t store the anything on disk. Second, it’s possible generate some truly disturbing scenes with this technology, so it might be best to only share this on a private Discord server that you control1That said, you can see some nightmarish examples on reddit, which means MidJourney is allowing it, but even then there are guardrails. What we’re doing here has no guardrails.
This information is provided “as-is”, for informational purposes only, and you are on your own for ensuring that nothing bad happens if you decide to do anything with it.
Let’s dig in!
Prerequisites
There are three main things you’ll need to have in order to make this work:
- Hardware capable of running this setup
- A python environment
- A Discord developer account
Hardware
The biggest one is hardware. You will need a GPU with 12GB of RAM. I have an RTX 3080 12GB2You have to be careful as there are also 10GB 3080 variants that probably won’t work. card, and it’s worked for me. Monitoring tools3I use gpustat -cp -P draw --watch -i 0.5, but nvidia-smi will also work. show that when the model is loaded in GPU RAM it’s using over 11GB of RAM, so 12GB should be sufficient. Since I have
an NVidia card, it’s
CUDA compliant, so
pytorch4See below. works quite well, but pytorch probably will work with
other cards. I would check that that’s the case before buying a non-CUDA card. I got mine for about $950, but you can
get one for less on eBay, (or more!), with the usual caveats about buying anything on eBay.
It’s possible that Amazon AWS or Google Cloud Services have instances with adequate hardware, but keep in mind that those services charge by the hour, and if you leave one running for a couple of days you can rack up quite a charge. I’ve heard tell of cases where a couple of days ran up to a couple hundred USD.
Python environment
The code for running the model uses the pytorch library to run the model. I use a miniconda python environment, in linux. Miniconda also has Windows and Mac versions available. The installation instructions should be fairly straightforward.
Once you have miniconda installed, the next thing you need to install is mamba. What is mamba? It’s a replacement
for the conda command that comes with miniconda because conda is totally broken. If you’ve successfully installed
miniconda, then your command prompt should have (base) at the beginning5The base inside parens is telling you which environment is active, and base is the default environment.. You should be able to run the two following commands
(base) user@localhost $ pip install mamba
...
(base) user@localhost $ mamba upgrade mamba
Once that’s done, you’ll want to create an environment specifically for this project, unless you’re sure this is the
only thing you’ll ever want to do with your python environment. I’m calling my environment chatbot, but you can call
yours whatever you like. I’m setting the python environment to be 3.9,
(base) user@localhost $ mamba create -n chatbot python=3.9
...
(base) user@localhost $ conda activate chatbot
Once you’ve activated the chatbot environment, you should see it in your prompt like below. Go ahead and install
pytorch, and then install numpy.
(chatbot) user@localhost $ mamba install pytorch
...
(chatbot) user@localhost $ mamba install numpy
...
Later on we’ll set up a github repository for actually loading the model and interacting with it. For that repo’s
dependencies we’ll use pip rather than mamba. Why do we have two commands for installing things? Because mamba
tries to get a version that’s compiled specifically for your hardware, whereas pip gets something more generic. For
heavy-duty numerical computing libraries like pytorch and numpy it’s worth a bit of extra effort getting it to work.
That said, mamba is more finicky about things, and it may not have the right version that’s compiled for your
hardware. For that matter, I recall having a time getting even mamba to install properly, so if any of this fails,
then just create the environment using conda, and the use pip to install everything, rather than mamba.
Discord developer account
It goes without saying that you’ll need a Discord account. To enable a bot you have to creat an application. I followed these instructions, which I’ll summarize here. First you’ll need to go to the developer portal and create an application. To do that, you have to give it a name, and agree to both the developer TOS and the developer policy. Basically, it sounds like you are agreeing to not do anything unreasonable, illegal or unethical, and not make Discord look bad, but again remember that I am not giving advice here and you are liable for whatever you do with it. This is also the part where you agree to respect the GDPR and other privacy laws, and you are also agreeing to clearly describe to your users what information you collect. That part is really easy if you don’t collect any information at all. Do you need to retain anything in order to not be liable for what your users do? Don’t ask me, because I don’t know. I am just doing this for fun, and I’m telling you about it for fun. That said, it’s probably best to only do this on a private, invite-only Discord server that you control, or ask a lawyer.
Once you’ve created your Application, you might want to go over to the Bot settings, and disable the Public bot
setting. After that, you have to invite your bot to the server where you want it to be active. There are a few hoops to
jump through, and the are described in
the bot account creation instructions.
Setting up the image generation model
The model itself that we’ll be using comes from the Huggingface model repository, so let’s install it first.
(chatbot) user@localhost $ pip install multilingual-clip
...
(chatbot) user@localhost $ pip install git+https://github.com/openai/CLIP.git
...
In order to actually generate images from it, we’ll need code for wrapping the text prompts into a format that the model
can consume. I used the Kandinsky-2 package on github6There are several sketchy things about this package. For one thing, it also appears under the Sberbank github repo,
which redirects to “ai-forever”. It appears that the authors are all employees of Sberbank, a sanctioned Russian bank.
Three of them have blogs and all are on Telegram. Nevertheless, the code is Apache 2 licensed and using it won’t send
Sberbank any money.. First you need to clone it, and then run setup.py.
(chatbot) user@localhost $ git clone https://github.com/ai-forever/Kandinsky-2.git
...
(chatbot) user@localhost $ cd Kandinsky-2
(chatbot) user@localhost $ python setup.py install
...
To test it, run a python session like so, import the model, and create a simple wrapper that passes in all of the default arguments:
 1: from kandinsky2 import get_kandinsky2
 2: from PIL import Image
 3:
 4: txt2img_model = get_kandinsky2('cuda', task_type='text2img',
 5:     model_version='2.1', use_flash_attention=False)
 6:
 7: txt2images = lambda prompt, size=768: txt2img_model.generate_text2img(
 8:     prompt,
 9:     num_steps=100,
10:     batch_size=1,
11:     guidance_scale=4,
12:     h=size, w=size,
13:     sampler='p_sampler',
14:     prior_cf_scale=4,
15:     prior_steps="5"
16: )[0]
Here we’ve imported a function get_kandinsky2 from the library we’ve installed, and called it with the appropriate
arguments. Note that the first one is "cuda" so if you have a non-CUDA card, then you’ll need to
figure out the pytorch term for your device. The function txt2images takes a prompt and a filename as arguments,
returns an image corresponding to the prompt.
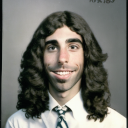
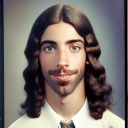
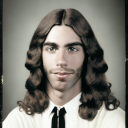
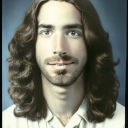
If you can call txt2images without error then congratulations, you’re in business, and you can now generate Jesus’
high school yearbook photos.
The Kandinsky-2 repo also has an image fusion model and an image-to-image model, but those won’t fit in my 12GB of RAM.
Setting up the Discord client.
If you’ve made it this far, then you can generate images of anything you like7Including a profile pic for your bot!. Now it’s time to share them on a Discord server. Since the code for generating images is in python, we’ll be using python for the client. The first thing is to install the client library like so:
(chatbot) user@localhost $ pip install python-discord
...
So what do we want this client to do? We want to be able to send it a prompt, and have it display the resulting image in the channel. We also want it to ignore anything that’s not intended as a prompt, so prompts will have to have a keyword or something8See below.. A slightly trickier aspect is that I only have to one GPU, and I use it for other things, so I’d like to run it for a few hours per day, and keep a queue of prompts. We’ll handle that later once we’ve got a basic client working.
It’s always nice to have a stub to work with, and the quickstart page has us covered.
 1: import discord
 2:
 3: intents = discord.Intents.default()
 4: intents.message_content = True
 5:
 6: client = discord.Client(intents=intents)
 7:
 8: @client.event
 9: async def on_ready():
10:     print(f'We have logged in as {client.user}')
11:
12: @client.event
13: async def on_message(message):
14:     if message.author == client.user:
15:         return
16:
17:     if message.content.startswith('$hello'):
18:         await message.channel.send('Hello!')
19:
20: client.run('your token here')
The quickstart page has a description of what these parts do, and a callout about how API keys should never be shared, which they shouldn’t. For that reason, API keys should also never be hard-coded, so instead we will be passing the key in as an environment variable. This will be set in a shell script with maximally restrictive permissions. We will pull that variable like so:
1: import os
2:
3: API_key = os.getenv("DBOT_API_KEY")
4: if API_key is None:
5:   print('API key must be supplied in env variable "DBOT_API_KEY"')
6:   exit(0)
7:
8: client.run(API_key)
The one thing that the
quickstart page doesn’t mention is the
intents. An intent is anything that your bot can possibly do on Discord. Some of them are Privileged. It just so
happens that the one shown above, intents.message_content, is Privileged, and will require verifying who you are with
Discord. This appears to be a Discord policy change in the last year or so, which would explain why the example they
provide doesn’t work out of the box. We’ll have to comment out that line.
What exactly is this message_content intent, anyway? How can a bot work if it can’t see the content of any messages?
According to the
API docs,
the message_content Intent determines,
Whether message content, attachments, embeds and components will be available in messages which do not meet the following criteria:
- The message was sent by the client
- The message was sent in direct messages
- The message mentions the client
In other words, this permission lets the bot listen in on all messages in the server, regardless of whether they were
sent to the bot, which could have serious privacy implications on public servers. This is actually a nice thing, because
it solves the problem of how to only respond to requests for an image – in order to have it generate an image, we will
have to directly mention the bot itself. So now we’re ready to launch the bot for the first time. We add these lines to
the on_message() function:
 9:   if not message.content:
10:     return # None of my business, apparently
11:
12:   print(
13: f"""
14:   author: {message.author}
15:   content: {message.content}
16:   channel: {message.channel}
17:   mentions: {message.mentions}
18: """)
19:   await message.reply(f"ack {message.content}")
Note the await keyword, because the reply() method is asynchronous.
To test this, I can run that script, and mention the chatbot in the server that I invited it to. If it’s working, this is what it will show in the terminal.
author: Chris#0
content: <@My bot's ID number> Test
channel: general
mentions: [<Member id=My bot's ID number name='MyChatBot' discriminator=...]
It also replied to my message with an ack in the channel.
So now we just need to strip out the mention using a regex9I firmly believe regexes are the root of about 3/4 of all headaches in software, but this is a very simple pattern to strip out., like so:
import re
...
prompt = re.sub("<@[0-9]+> ", "", message.content)
So now we’re ready to have it generate images. Next problem – how do we attach an image to the reply? The reply()
method is just a wrapper for a more general
send()
method. Sure enough, it has a reference argument for indicating which message we are replying to, and a file
argument for attaching a file. The file argument has to be of type
discord.File.
First, let’s see if we can get a reply using send(). Replacing the call in 9 with,
20: await message.channel.send(
21:   content=f"Creating an image for '{prompt}'",
22:   reference=message.to_reference()
23: )
… and sure enough it works. We already know how to generate an image from a prompt, so we’re almost home free. The
simplest way to do this would be to write the file to a temporary location, say in /tmp, pass the file’s name, and
then delete it, but remember we promised not to write any user data to disk, and besides, that’s not as elegant as it
sounds, since we’d have to make a random name for it and make sure it’s done sending before we delete it10Okay,
await probably handles that, but we would still need to test that assumption., etc. It turns out that the
discord.File API reference says that
you just need to be able to pass it a file pointer, which can be a plain byte stream. The Kandinsky model returns a
PIL Image object, so we just need to pass a
byte stream object instead. The python
BytesIO
class should work.
Putting it all together, and taking the filename argument out of txt2images so that it just returns a PIL Image, we have:
 1: prompt = re.sub("<@[0-9]+> ", "", message.content)
 2: buff = io.BytesIO()
 3: image = txt2images(prompt, 768)
 4: image.save(buff, format="png")
 5: buff.seek(0)
 6: image_file = discord.File(buff, "image.png", description=prompt)
 7:
 8: await message.channel.send(
 9:   content=f"Creating an image for '{prompt}'",
10:   reference=message.to_reference(),
11:   file=image_file
12: )
This definitely works, except for one thing. For some reason11probably a Discord bug, or a py-discord bug,, when I instantiate the image generating model, the message content, i.e. the prompt, is missing when messages arrive on a server channel, but not in DMs. I sometimes find that I have to ping the chatbot 3 times in order for it to see the message, and there doesn’t seem to be an apparent pattern to it.
That’s ok, because next we’re going to split the chatbot and image generating model into two separate processes, so the image generating model won’t be in the same process as the chat bot.
Setting up a queue
Remember that I only want to have the image generator online for a little while at a time because it takes up my whole GPU, and I need it for other things. What I’d like to do is have the chatbot respond to each message by putting it in a queue. Whenever the image generator comes on line, it will empty the queue, passing the images back to the chatbot, which will then generate the appropriate replies.
We’ll have to have two processes for this since one, the image generator, will be starting up and shutting down
intermittently, while the other, the chatbot client, will be up all of the time. This means that most of the idioms in the
python multiprocessing library won’t be
applicable. Fortunately, there is a
Manager class that
permits persistent connections between processes that may come and go. We also need some kind of an Inter-Process
Communication (IPC) Queue for sending data back and forth, and fortunately the multiprocessing library
has one.
The chatbot client will be up persistently, so it will have to manage the queues. Since the Manager class and the chat
client both have event-loops that want to run forever, we’ll need to set them up in separate threads. This is ok, since
they will only be communicating through an IPC mechanism. The Manager itself needs a hostname and port number, which is
how the other process will find it. For the hostname we’ll just use localhost, and for the port number we’ll take
that in as an environment variable just like we did for the API key. To set that up, we have:
 1: from multiprocessing import Queue
 2: from multiprocessing.managers import BaseManager
 3: from threading import Thread
 4:
 5: msg_q = Queue() # A Queue for sending prompts
 6: img_q = Queue() # A Queue for sending images
 7:
 8: class QManager(BaseManager): pass
 9: QManager.register("msg_q", callable=lambda: msg_q)
10: QManager.register("img_q", callable=lambda: img_q)
11:
12: manager = QManager(address=("localhost", int(PORT)), authkey=API_key.encode("utf8"))
13: server = manager.get_server()
14: server_p = Thread(target=server.serve_forever)
15: server_p.start()
To use our custom QManager class, we have to “register” class methods to get each IPC Queue. Also notice that the
Manager likes to have an authkey, which the image generator will also need to have in order to connect to it. Since we
already have a secret API key, we’ll use that. This means that the image generator will also have to pull the API key
from an environment variable.
So now we have to adapt the chatbot to put the prompts in the queue, rather than generating the images like above.
There’s one wrinkle to smooth out – above we needed the original message object in order to reply to it. It has the
server, channel, user and message identifying information needed in order to reply to the specific message that had a
prompt. The thing is, we can’t pass those between processes because they have components in them that are not
serializable. So now we also need a way of keeping track of those message objects on the chatbot side so that we don’t
lose track of them. To do that, we’ll make a custom discord.Client subclass. Now, the on_message method will have
access to a self object where we can store the message objects. The message object has an id member, so we’ll use
that. Since async methods don’t inherit variables from their containing scope, we also need a way for them to have
access to msg_q, and this solves that problem as well.
Now it looks like this:
 1: class DBOTClient(discord.Client):
 2:   def __init__(self):
 3:     self.messages = {}
 4:     self.msg_q = msg_q
 5:
 6:     intents = discord.Intents.default()
 7:     super(DBOTClient, self).__init__(intents=intents)
 8:
 9:   async def on_ready(self):
10:     print(f'We have logged in as {self.user}')
11:
12:   async def on_message(self, message):
13:     if message.author == self.user:
14:       return
15:
16:     if not message.content:
17:       return # None of my business, apparently
18:
19:     prompt = re.sub("<@[0-9]+> ", "", message.content)
20:
21:     # Save the message for later.
22:     self.msg_q.put([message.id, prompt])
23:     self.messages[message.id] = message
24:     await message.channel.send(content=f"Your prompt '{prompt}' is in the queue")
25:
26: client = DBOTClient()
27: p = Thread(target=client.run, args=(API_key,))
28: p.start()
We now have a constructor that lets us tuck away the dictionary and the message queue so we can find it when
we receive the message. There’s more left to do after this, so we’ll put the chat client in its own thread just like we
did the QManager.
Now that we have a queue, we need a way to empty it. On the image generator side we need to access the same QManager
that we created in the chatbot process. We set everything up the same way, except this time we call a connect() method
which makes the manager refer to a foreign Manager. We also register the names of the methods, but only the names. Once
we’ve connected to it, we enter a forever-loop where we take a key and a prompt off of the queue, generate an image from
the prompt, and send a key and an image to the other queue.
 1: class QManager(BaseManager): pass
 2: QManager.register("msg_q")
 3: QManager.register("img_q")
 4: manager = QManager(address=("localhost", int(PORT)), authkey=API_key.encode("utf8"))
 5: manager.connect()
 6: msg_q = manager.msg_q()
 7: img_q = manager.img_q()
 8:
 9: while True:
10:   key, prompt = msg_q.get()
11:   print(prompt)
12:   image = txt2images(prompt, 768)
13:   img_q.put((key, image))
Finally, we need to send the reply with the images. This is mostly the same as the code above, but there’s one last
wrinkle. The Discord bot wants to run everything asynchronously, and to do that it has to have an
event loop. When we call our method to send the
reply, we need it to be in the chat client’s event loop. Fortunately the client exposes a client.loop member that we
can use. Instead of using the await keyword, we have to call it with a special event-loop runner,
asyncio.run_coroutine_threadsafe(), which takes client.loop as an argument, like so:
 1: import asyncio
 2: def DBOT_send_reply(client, key, image):
 3:   message = client.messages[key]
 4:   prompt = re.sub("<@[0-9]+> ", "", message.content)
 5:
 6:   buff = io.BytesIO()
 7:   image.save(buff, format="png")
 8:   buff.seek(0)
 9:   image_file = discord.File(buff, "image.png", description=prompt)
10:
11:   asyncio.run_coroutine_threadsafe(
12:     message.channel.send(
13:       content=f"Here is your image for \n'{prompt}'",
14:       reference=message.to_reference(),
15:       file=image_file
16:     ),
17:     client.loop)
18:
19:
20: while True:
21:   key, image = img_q.get()
22:   DBOT_send_reply(client, key, image)
23:   del client.messages[key]
So that’s it. Now we can generate all the images we want in Discord, which is something nobody could do before maybe a
year ago. Will this change the world?
Comments
Comments can be left on twitter, mastodon, as well as below, so have at it.
New post!
— The Weary Travelers blog (@wearyTravlrsBlg) June 18, 2023
Have you ever wanted to run your own image generating AI and connect it to Discord? Find out how.https://t.co/exniU4A259
Reply here if you have comments.
To view the Giscus comment thread, enable Giscus and GitHub’s JavaScript or navigate to the specific discussion on Github.
Footnotes:
That said, you can see some nightmarish examples on reddit, which means MidJourney is allowing it, but even then there are guardrails
You have to be careful as there are also 10GB 3080 variants that probably won’t work.
I use gpustat -cp -P draw --watch -i 0.5, but nvidia-smi will also work.
See below.
The base inside parens is telling you which environment is active, and base is the default environment.
There are several sketchy things about this package. For one thing, it also appears under the Sberbank github repo, which redirects to “ai-forever”. It appears that the authors are all employees of Sberbank, a sanctioned Russian bank. Three of them have blogs and all are on Telegram. Nevertheless, the code is Apache 2 licensed and using it won’t send Sberbank any money.
Including a profile pic for your bot!
See below.
I firmly believe regexes are the root of about 3/4 of all headaches in software, but this is a very simple pattern to strip out.
Okay,
await probably handles that, but we would still need to test that assumption.
probably a Discord bug, or a py-discord bug,